Integrating with Miva Merchant
Apruve is available as a plugin for Miva Merchant. This guide assumes that you have an existing Miva Merchant store set up on your server or hosted by Miva.
Step 1 - Create an Apruve Merchant account
You will need a merchant account to test the Apruve integration. Please contact us to get started.
You will receive an email containing a link to confirm the account - you'll need to confirm it before you can move forward and use it.
Step 2 - Install the Apruve plugin
- Log into your Miva Merchant Administration Interface
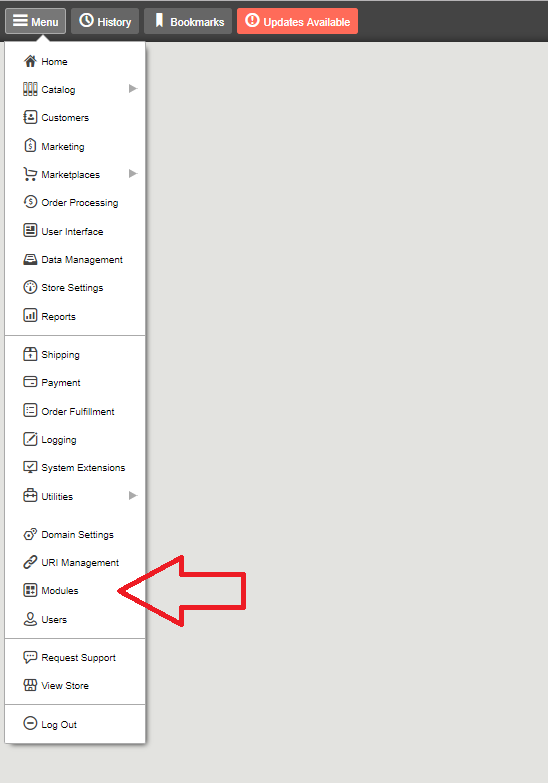
- Navigate to the Modules screen by expanding the Top Menu button, followed by the Modules Icon.

- Once you are inside the Modules menu, click the Add Module button (+).

- Click the Upload File button, locate the apruve.mvc file that you received from Apruve, and select the file.
- Confirm the upload which will close the File window.
- Click the Add button to complete the Domain Level installation.
Install Apruve into your store.
- Navigate to your Payment Settings by expanding the Top Menu and clicking on the Payment icon.
- Click the Add/Remove Modules tab.
- Locate the Apruve Automated B2B Credit Program Payment System under the Available Modules section.
- Click Install button to Activate Apruve in your store.
Step 3 - Configure the Apruve plugin
Your Miva Apruve Settings can be found in the Payment interface of your Store, under the Apruve B2B Payment Gateway tab. Fill in the Apruve merchant ID and Apruve API key from the technical tab of your Apruve account, then fill in the Apruve URL item with https://test.apruve.com if your credentials are for test or https://app.apruve.com if they are for production.
Check the Auto-invoice when shipments ship checkbox if you would like to automatically generate Apruve invoices corresponding to your Miva shipments when the Miva shipments ship.
Don't forget to click "Update" to save your settings.

Copy the Apruve Webhook URL from the bottom of the Apruve B2B Payment Gateway tab, then log in to the Apruve app and navigae to Settings > Technical in the sidebar.
Scroll to the bottom of that page and paste the URL you copied into the "Webhook URL" input, then click "Save Notification Preferences". You do not need to fill out the Authorization Header field.

You are now integrated with Apruve!
Updated 5 months ago
