
Integrating with FoxyCart
Integrating Apruve with FoxyCart requires relabeling the existing Purchase Order payment method and making some small modifications to your checkout and receipt templates. The following instructions describe how to add Apruve to FoxyCart's default checkout and receipt pages. FoxyCart implementations can be and often are extensively customized, so integration with your store might require some tweaks here or there. These steps should get you started, at the very least. If you need help with your specific scenario, please contact us at [email protected].
These steps apply to FoxyCart v1.0 and v1.1. Please contact us at [email protected] if you require support for v2.0. Earlier versions are not supported.
Apruve Merchant Account Changes
Before you get started, make sure that you have an Apruve merchant account and an API key (more information is available here). Once you have those created, contact [email protected] to get your account set up for use with FoxyCart. We will need to know two things:
- Your FoxyCart store URL. If you have a separate storefront and cart URLs, we need the URL for the cart.
- Your FoxyCart API Key
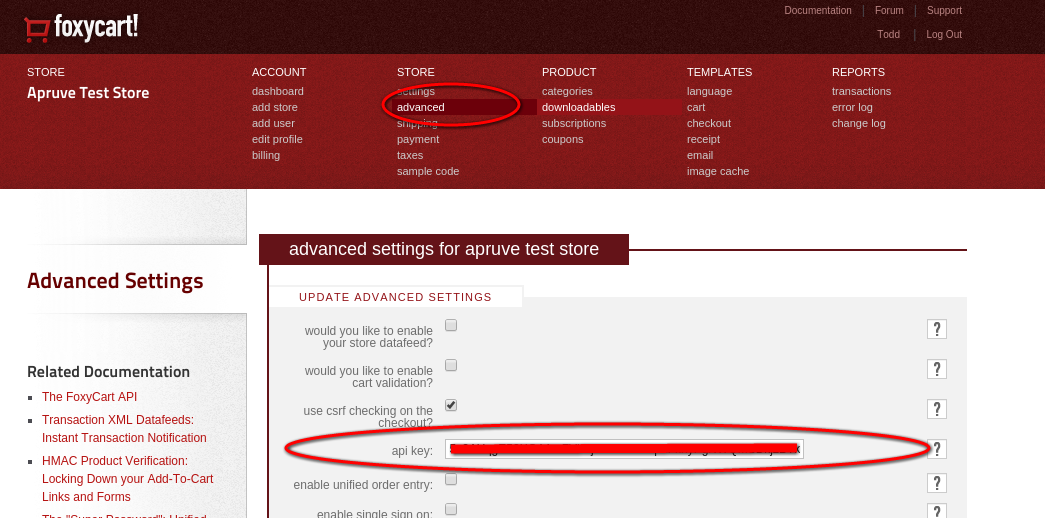
The API key may be found in the 'advanced' section of the FoxyCart admin console:
Re-labeling the Purchase Order payment method
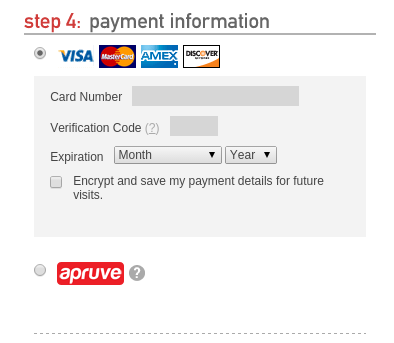
There are two goals these steps are meant to accomplish. First (and most importantly), we replace the label for the Purchase Order payment type with the HTML for the Apruve button's container. This will ultimately cause the Apruve button to appear in the payment options list on the checkout page, like so:
Second, we change will change a label so that the receipt page will correctly show that the order was processed with Apruve.
If your FoxyCart store does not already use the Purchase Order payment type, enable it in the FoxyCart admin console:

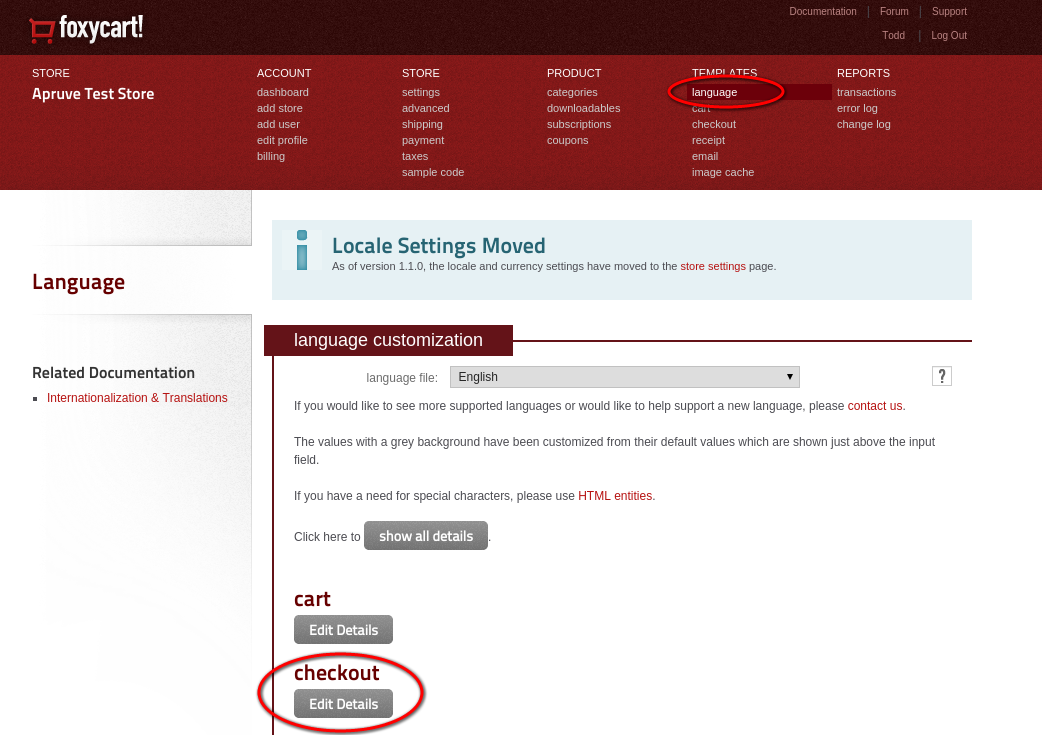
Go to the language section of the admin console and edit the details for Checkout:
Find the field for 'pay with purchase order' and replace the value there with the following HTML code:
Code snippet for "pay with purchase order" field
<div id="apruveDiv"></div>

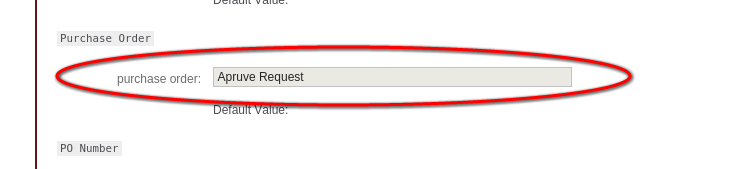
Finally, find the field for 'Purchase Order' and replace the value there with 'Apruve Request'
Modifying the Checkout Template
The modifications to the Checkout page include adding script tags to load the code for the Apruve button and checkout process, and modifying the HTML for the payment options list to properly display the Apruve button. These changes will require that you start with the Twig-based template and make changes to code copied from the checkout Twig template as described here: https://wiki.foxycart.com/v/1.1/templates#using_twig_with_foxycart
Add a <script> tag for the Apruve checkout javascript to the template's <head> tag, as seen on line 11:
Code snippet for checkout Javascript
<head>
    <meta charset="utf-8">
    <title>{{ store_name|raw }} Checkout</title>
    {# if you plan to customize your template, use the "text" theme instead of the "standard" one. #}
    {#
    <link rel="stylesheet" href="https://{{ store_domain }}/themes/text/styles.css" type="text/css" media="screen"
          charset="utf-8"/>
    #}
    <link rel="stylesheet" href="https://{{ store_domain }}/themes/standard/styles.css" type="text/css" media="screen"
          charset="utf-8"/>
    <script src="[APRUVE_SERVER]/js/apruve_fc.js?merchant_id=[MERCHANT_ID]" type="text/javascript"></script>
</head>
Note: Apruve's FoxyCart integration requires jQuery 1.9 or later. FoxyCart includes jQuery in its JavaScript libraries, but you will need to make sure that the Apruve script appears after the FoxyCart script to take advantage of that.
Replace [APRUVE_SERVER] with whichever Apruve URL is appropriate for your environment (https://test.apruve.com for test, or https://app.apruve.com for production).
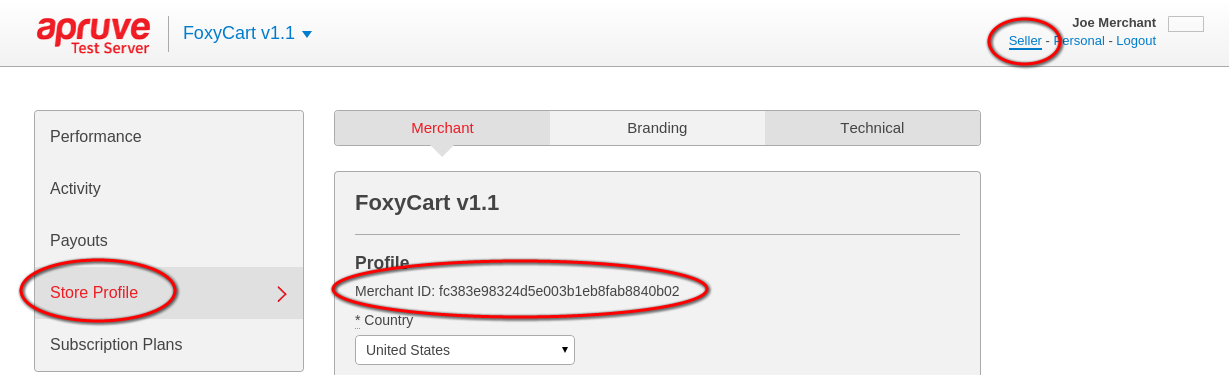
Replace [MERCHANT_ID] with your Apruve merchant account's merchant ID. This value can be found by logging into Apruve, switching to the Seller context, and viewing your Store Profile:
You may also customize the appearance of the Apruve button by adding a display parameter to the script URL as described here.
Next, we will be customizing the payment options HTML. The next steps all refer to the following code block. If the {{ block('checkout_payment') }} Twig directive in the standard checkout template has been replaced with the corresponding code from the checkout.inc.twig file (available here) and the previous steps in this section have been completed, this block will start at around line 220.
Code snippet for payment method HTML
{% if supports_purchase_order and not is_updateinfo %}
<li id="fc_payment_method_purchase_order_container" class="fc_row fc_row_payment_method">
    <label for="fc_payment_method_purchase_order" class="fc_radio" style="display: inline-flex;">
        <input type="{{ payment_method_input_type }}"{% if payment_method_type == 'purchase_order' %}
        checked="checked"{% endif %} name="fc_payment_method" id="fc_payment_method_purchase_order"
        class="fc_radio" value="purchase_order" autocomplete="off" />
        <span>{{ lang.checkout_pay_with_purchase_order|raw }}</span>
    </label>
    <input value="paid_with_apruve" type="hidden" name="purchase_order"
           id="purchase_order"
           class="fc_text fc_required"/>
    {% if has_multiple_payment_options %}
    <fieldset>
        <ol>
            {% else %}
</li>
{% endif %}{# has_multiple_payment_options #}
<li>
    <p>You will be prompted to complete the Apruve process when you complete your checkout.</p>
</li>
{% if has_multiple_payment_options %}
</ol>
</fieldset>
</li>
{% endif %}{# has_multiple_payment_options #}
{% endif %}{# supports_purchase_order and not is_updateinfo #}
<li id="li_nopayment" class="fc_row">
    {# This is used for $0 transactions and other situations where no payment info is collected #}
    {{ lang.checkout_no_payment_needed|raw }}
</li>
</ol>
<div id="fc_complete_order_button_container" class="fc_row fc_row_actions">
    <button id="fc_complete_order_button" class="fc_button{{ submit_button_class }}" type="button"
        value="{{ submit_button_value }}" onclick="apruveControls.doFoxyCartCheckout()">{{
        submit_button_value }}
    </button>
    <div id="fc_complete_order_processing" style="display:none;"><strong class="fc_error"></strong>
        <br/><img src="//cdn.foxycart.com/static{{ base_directory }}/images/ajax-loader.gif?ver=1"
                  alt="{{ lang.checkout_loading|raw }}" width="220" height="19"/></div>
</div>
- Add the
"display: inline-flex"inline style to the payment method's<label>tag as seen on line 3. This ensures the Apruve button will display correctly. - Add the
<input>tag as seen on line 9. This adds a hidden purchase order number field that the Apruve checkout process will populate with the Apruve payment request ID. - Replace the contents of the
<li>tag starting on line 18 with the<p>tag as seen above. This replaces the purchase order number entry field normally associated with this payment method with a brief description of how the Apruve checkout will work (use whatever language you like here). - Replace the onclick handler for the checkout button with
apruveControls.doFoxyCartCheckout()as seen on line 34. This will trigger the Apruve checkout process when the checkout button is clicked with the Apruve payment method selected.
Modifying the Receipt Template
The main change to the receipt template is adding a JSONP script that will update the Apruve request with the finalized shipping and tax amounts for the order and will escalate the payment request to the requested payer. The other minor change is to remove the purchase order number field from the receipt (which now contains the Apruve payment request ID, a piece of information not interesting to the shopper).
As with the checkout template, we will be working with the Twig version of the receipt template. Add the payment request escalation Javascript to the template's tag as seen on line 11 below:
Code snippet for receipt page Javascript
<head>
    <meta charset="utf-8">
    <title>{{ store_name|raw }} Receipt</title>
    {# if you plan to customize your template, use the "text" theme instead of the "standard" one. #}
    {#
    <link rel="stylesheet" href="https://{{ store_domain }}/themes/text/styles.css" type="text/css" media="screen"
          charset="utf-8"/>
    #}
    <link rel="stylesheet" href="https://{{ store_domain }}/themes/standard/styles.css" type="text/css" media="screen"
          charset="utf-8"/>
    <script type="text/javascript">
        $(function () {
            $.ajax({
                url: '[APRUVE_SERVER]/foxy_cart/escalate',
                data: 'merchant_id=[MERCHANT_ID]&order_id=' + $('.fc_order_id .fc_text').contents()[0].data,
                dataType: 'jsonp',
                success: function () {
                },
                error: function () {
                }
            });
        });
    </script>
</head>
Replace [APRUVE_SERVER] with appropriate URL for the Apruve environment you're integrating with (https://test.apruve.com for test, https://app.apruve.com for production).
Replace [MERCHANT_ID] with your Apruve merchant account's merchant ID.
If the {{ block('order_information') }} Twig directive from the standard receipt template has been replaced with the corresponding code from the receipt.inc.twig file (available here) and the previous steps in this section have been completed, this block will start at around line 50 of the template.
Code snippet for receipt page Javascript
{{ block('general_information') }}{# Processor response and date #}
<div id="fc_receipt_order_container" class="fc_fieldset_container ">
    <h2>{{ lang.checkout_order_information|raw }}</h2>
    <fieldset id="fc_receipt_order">
        <legend>{{ lang.checkout_order_information|raw }}</legend>
        <div class="fc_inner">
            <ol id="fc_receipt_order_list">
                <li class="fc_row fc_order_id">
                    <span class="fc_pre">{{ lang.checkout_order_id|raw }}<span class="fc_colon">:</span></span>
                    <span class="fc_text">{{ order_id }}</span>
                </li>
            {% if purchase_order != '' %}
                <li class="fc_row fc_purchase_order">
                    <span class="fc_pre">{{ lang.checkout_purchase_order|raw }}<span class="fc_colon">:</span></span>
                    <span class="fc_text">{{ purchase_order }}</span>
                </li>
            {% endif %}
            {% if payment_type == 'plastic' %}
                <li class="fc_row fc_cc_number_masked">
                    <span class="fc_pre">{{ lang.checkout_card_number|raw }}<span class="fc_colon">:</span></span>
                    <span class="fc_text">{{ cc_number_masked }} ({{ cc_type }})</span>
                </li>
            {% endif %}
Remove the entire Twig if directive starting at line 12. This will remove display of the purchase order number.
Modifying the Receipt Email
As is the case with the receipt page, the default FoxyCart receipt email templates include a purchase order number field that needs to be hidden from the end user. There are two templates that need to be changed: one for HTML email and one for text email.
Text template
The {% include 'email_order_details.inc.txt.twig' %} Twig directive appears in the default template four times. Each will need to be replaced with the contents of the email_order_details.inc.twig file (available here). The first such directive starts at around line 12 of the template.
Code snippet for receipt page Javascript
{# BEGIN EMAIL ORDER DETAILS TWIG TEMPLATE #}
{% if not is_updateinfo %}
{% if has_downloadables %}
{{ lang.email_text_downloadable_products|raw|pad(60,"-"," ") }}

{{ text_downloadable_links|raw }}

{% endif %}
{{ lang.email_text_order_summary|raw|pad(60,"-"," ") }}

  * {{ lang.email_order_number|raw|pad(20) }} {{ order_id }}
  * {{ lang.checkout_date|raw|pad(20) }} {{ checkout_date }}
{% if purchase_order != '' %}
  * {{ lang.checkout_purchase_order|raw|pad(20) }} {{ purchase_order }}
{% endif %}
{% if payment_type == 'plastic' %}
  * {{ lang.checkout_card_number|raw|pad(20) }} {{ cc_number_masked }} ({{ cc_type }})
{% endif %}
Remove the entire Twig if directive that starts on line 13. This will remove display of the purchase order field. Repeat this for the other three places the Twig template was included. (Searching for 'purchase_order' is the easiest way to find them).
HTML Template
The {% include 'email_order_details.inc.twig' %} Twig directive appears in the default template four times. Each will need to be replaced with the contents of the email_order_details.inc.twig file (available here). The first such directive appears at around line 233 of the template.
Code snippet for receipt page Javascript
{# BEGIN EMAIL TWIG TEMPLATE #}
{% if not is_updateinfo %}
    {% if has_downloadables %}
        <p id="fc_downloadable_products" class="fc_heading">
            <strong>{{ lang.email_html_downloadable_products|raw }}</strong>
        </p>
        <ol style="font-size:12px;" id="fc_download_links_list">
            {{ html_downloadable_links|raw }}
        </ol>
    {% endif %}
        <p id="fc_order_summary" class="fc_heading"><strong>{{ lang.email_html_order_summary|raw }}</strong></p>
        <ul style="font-size:12px;" id="fc_order_summary_ul">
            <li><strong>{{ lang.email_order_number|raw }}:</strong> {{ order_id }}</li>
            <li><strong>{{ lang.checkout_date|raw }}:</strong> {{ checkout_date }}</li>
        {% if purchase_order != '' %}
            <li><strong>{{ lang.checkout_purchase_order|raw }}:</strong> {{ purchase_order }}</li>
        {% endif %}
        {% if payment_type == 'plastic' %}
            <li><strong>{{ lang.checkout_card_number|raw }}:</strong> {{ cc_number_masked }} ({{ cc_type }})</li>
        {% endif %}
Remove the entire Twig if directive that starts on line 15. This will remove display of the purchase order field.Repeat this for the other three places the Twig template was included. (Searching for 'purchase_order' is the easiest way to find them).
That's it -- you're done!
Technical Details
The Apruve FoxyCart integration completely takes over FoxyCart's purchase order payment method, including the purchase order field on the cart/transaction. When a FoxyCart checkout is completed with Apruve, this field will contain the Apruve payment request ID.
FoxyCart values are mapped to Apruve payment requests and line items as follows:
| Apruve value | FoxyCart value |
|---|---|
| PaymentRequest.merchant_order_id | transaction.id |
| PaymentRequest.shipping | transaction.shipping_total |
| PaymentRequest.tax | transaction.tax_total |
| PaymentRequest.amount | transaction.order_total |
| LineItem.title | product.name |
| LineItem.description | product.options.description |
| LineItem.amount | product.price |
| LineItem.quantity | product.quantity |
| LineItem.price_ea | product.price_each |
| LineItem.view_product_url | product.url |
| LineItem.sku | product.code |
Updated over 6 years ago